Character controller
Plan:
-Create and set up the scene.
-Add all necessary GameObjects and Components.
-Learn about and create Materials.
-Write our first C# script.
-Set up the camera to follow the new GameObject.
-Create and set up the scene.
-Add all necessary GameObjects and Components.
-Learn about and create Materials.
-Write our first C# script.
-Set up the camera to follow the new GameObject.
In this tutorial, we will create our own first-person character controller. This will allow us to use our keyboard to move around the game world.
To begin this tutorial, we need a project and scene, which by now you already know how to do. If you need to review how to do this, visit the first tutorial, "Intro to Unity". Be sure to save the scene into a "_Scenes" folder like we learned how to do last tutorial, "Creating our first Rigidbody". Again, for this project, the name of the scene is not important (I called mine "scene").
We also need a flat plane, which we have done before in the last tutorial.
We also need a flat plane, which we have done before in the last tutorial.
Excellent. So we have our plane. For this, we don't need to worry about position, rotation, and scale. Make sure that all 3 Position coordinates are at zero, all 3 Rotation coordinates are at zero, and all three Scale sizes are at zero. Now, we need a cube. But, unlike last time, we only need to move it one metre vertically. We do this by changing the Y coordinate to 1 instead of 5. We will also need to change the Y Scale to 2, to make it roughly human-proportioned.

Now, add a Rigidbody, and leave everything the way it is.
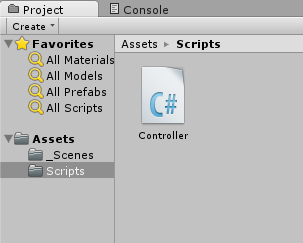
Create a new folder in your main Assets directory (next to, not in the "_Scenes" folder), and name it "Scripts". Right-Click -> Create -> "C# Script". The name field will automatically be selected, and type in "Controller".
Create a new folder in your main Assets directory (next to, not in the "_Scenes" folder), and name it "Scripts". Right-Click -> Create -> "C# Script". The name field will automatically be selected, and type in "Controller".
Double-click on the new script, and Unity's MonoDevelop will open. It should look something like this:

This script, as it has no working code, will do nothing. The Start function runs at the very beginning of the scene, and the Update function runs sixty times per second. Because we want our character controller to work all of the time, our code will go in Update.
Change your Update function to look like this:
Change your Update function to look like this:
// Update is called once per frame
void Update () {
if (Input.GetKey (KeyCode.W)) {
this.gameObject.GetComponent<Rigidbody>().AddForce(Vector3.forward);
}
}
Before we learn what this does, save the script! Until you save the script, the changes will not be applied. Press Ctrl+S (Command+S on a Mac) to save.
Now, let's go over how this works.
-Everything with "//" before it is a COMMENT. Comments are just for developers and do not run as code. You can put anything you want in a comment, and nothing will happen. This means that "// Update is called once per frame" does nothing.
-"void Update() {" : "Void" means that this code will run, but will not return anything to whatever called it (in this case, Unity itself). "Update" is the name of the void function, one of Unity's several functions with built-in functionality (Update automatically runs 60 times per second). The parentheses mean that nothing needs to be supplied by whatever called this function (Unity), and we will explore more on this in future tutorials. Finally, the opening curly-bracket causes everything between it and the last curly-bracket (on the last line of our new function) will be a part of the Update function.
-"if (Input.GetKey (KeyCode.W)) {": If the computer detects that the "w" key is pressed, it will run the code between the beginning bracket and the bracket that ends the "if" statement, not the one that ends the "Update" function.
-"this.gameObject.GetComponent<Rigidbody>().AddForce(Vector3.forward);": This GameObject will find the Rigidbody attached to it. If there is none, the code will return an error, which is why we added a Rigidbody earlier. AddForce takes the direction you supplied it (in this case, Vector3.forward), and pushes the rigidbody in that direction. Finally, "Vector3.forward" is an abbreviation for the 3D coordinate (0, 0, 1).
Now, return to Unity and press "Play", and then the "W" key on your keyboard. Nothing happens. The script needs to be attached to the cube. To do this, click-and-drag our script to the "Cube" GameObject in the Hierarchy on the left side of your screen, and save the scene. The Cube's Inspector should now list our script as a component attached to it.

Pressing W still does nothing. This is because the force we applied with AddForce is not strong enough to move it. Click "Play" again to stop the scene, return to MonoDevelop, make the following changes to your code, save the script, and return to Unity.

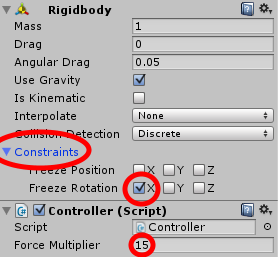
Now, the script's Inspector entry should look something like this:

Change "Force Multiplier" to 15, play the scene and hold W. The cube should slowly tumble across the plane and then fly off the edge. But when real people walk, they (typically) don't roll over and over uncontrollably. To do this, we need to freeze the X rotation of the player. We do this like this:
Click "Play" again to stop the scene. Now, in the Hierarchy, click-and-drag "Main Camera" onto "Cube". In "Main Camera"'s inspector, click the gear in the top-right of the "Transform" box and click "Reset". Now, the camera is where the "eyes" are and will follow our cube-player around.
Now, we will code in how to rotate the player. But first, freeze the Z rotation of the cube-player! This will stop more uncontrollable tumbling. We also need more script changes:

First, we need to change ".AddForce" to ".AddRelativeForce". AddForce would work just fine, if we were not turning the player. AddRelativeForce works like AddForce, but the rigidbody is pushed in that direction relative to its rotation.
We also need to add two new "if" statements for turning (A turns left, D turns righ)
We also need to add two new "if" statements for turning (A turns left, D turns righ)
if (Input.GetKey (KeyCode.A)) {
this.gameObject.transform.Rotate(new Vector3(0, -5, 0));
}
if (Input.GetKey (KeyCode.D)) {
this.gameObject.transform.Rotate(new Vector3(0, 5, 0));
}
Save the script, return to Unity, and hit "Play". The W key accelerates the player forward, and the A and D keys turn them left and right.
Enjoyed this tutorial? Consider donating on Patreon.
Enjoyed this tutorial? Consider donating on Patreon.
